Tuesday, February 19, 2013

Seventh heaven @ Ambush

Seventh day of the lunar new year and according to the Chinese, 
this is the day where everyone celebrates their birthday.
Nowadays, most Chinese celebrate this day with the seven colored vegetables lo hei.
I had two of those lined up for me but first,
let's do a celebration at Ambush's latest outlet!

The Atrium @ Dhoby Ghaut is now opened with even more dining options at Plaza Singapura.
Stepping off the escalator on the topmost floor finds you at Chef Wan's on the right and Hifumi on the left.
Just keep walking straight.
And ambush is right there, smack in the centre.
But amusingly inconspicuous as a dining outlet because their central kitchen is tucked away in a corner away from the dining area.
Now there's a dining place you wouldn't have to worry about leaving with the smell of oil. :)


A Staub!
Now that really impressed me.
I don't know if they do this for normal service but with prices as affordable as Ambush,
I did not expect much on presentation.


And what about taste?
Those delicious pieces of crackling.
The pieces of pork knuckle had a considerably low fat to meat ratio.
It's definitely a bang for your buck.
But I digress.
The satisfying crunch of the crisp crackling.
The juice that oozes out from the meat with every cut of the knife.
This was a good start.


And did I forget the sides?
Thick and creamy mash with additional gravy on the side.
Sauerkraut and mustard was an addition of a new dimension on taste for those less of a carnivore.
I was all ready for a weissbier!


We also had sharing pots of mussels done two ways.
This was the one done Aglio Olio style.
Spicy and full on garlic flavour.
A typically Asian palate would find this to be familiar.
A scoop of the gravy and that full mussel creates a stellar burst of flavours in your mouth.
Eat with caution.
You'll be going for seconds and thirds in no time.

We also had an earlier pot of mussels done the original Vin Blanc style.
Perhaps it was cold by the time all of us paparazzi people were done.
But the sauce had a very strong sour aftertaste that wasn't very pleasing on the taste buds.
I'll be sure to try it hot the next time.

An Earl Grey Vanilla to refresh my taste buds for my much anticipated order of a duck confit.


Perhaps the starters stole the limelight.
But this didn't shine for me.
The duck confit was a good sized duck leg.
Salted and seasoned with herbs, those were very evident in the taste of the meat.
However, the poaching process seems to have been skipped as the meat was not meltingly tender.
Fried, the duck leg had a crisp layer of skin but I had enough of all that skin from the previous starter of pork knuckles.

The Negra Paella which was shared amongst us, was a whole different story.
Served with a generous variety of seafood,
this was perfect for sharing.
Those grains were coated evenly with dark squid ink which aside from staining one's teeth, 
could be worryingly pungent if not handled properly.
Which wasn't a valid concern at all.
Every bite was a bite of yum!
Seafood and squid ink coated rice.
Ink black is the new black guys.

And then, with a tummy too full,
I was off for my seven colored vegetable tossing events.
Happy birthday to me and everyone else! :)

“At Ambush, Everyone Gets a Little Taste of Europe”
Perfect for large group dining events with their dining arrangements
and moderately affordable prices,
I'll be back at Ambush soon enough for my next large group gathering!

Ambush
Plaza Singapura 
68 Orchard Road #04-64/66 (The Atrium)
Singapore 238839

This was an invited food tasting session but all opinions shared are author's own.
Many thanks to OpenRice, Estelle and Ambush for their kind invite to a fun-filled food tasting session.


Wednesday, February 06, 2013

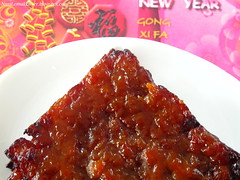
putting the chinese back into the lunar new year with bak kwa! :)

Homemade Chinese Pork Jery (Bak Kwa) 肉干
(recipe source: by Sonia aka Nasi Lemak Lover)
*makes 9pcs, perfectly for a tray size 13”x13” (4mm height)

Homemade Chinese Pork Jery (Bak Kwa) 肉干450g minced pork (at least with 10% fat)
100g sugar

1tbsp light soy sauce
1/2tbsp Chinese rice wine
1/2tbsp fish sauce
1tbsp oyster sauce
1tsp dark caramel sauce
1/8tsp Chinese five spices powder
A dash of Pepper
1/2tsp-3/4tsp salt or to taste
2tbsp honey


Method
1. Put all ingredients in a big bowl and start mixing them with a pair of chopsticks. Blend and stir the mixture in one direction until the meat becomes gluey (Latest update on 18 Jan-very important to stir till gluey otherwise meat will break out). Store in the fridge for several hours.
2. Spread the marinated minced pork thinly onto the baking tray (using fingers to spread).
3. Bake at pre-heated oven at 160C for 20mins (Latest update on 18 Jan-15mins also good enough). Remove from oven. Increase the oven temperature to 240c.
4. Wait to slightly cool, cut into your desired size and shape using scissor, knife or pizza cutter, place them in the same baking tray.
5. Grill (top heat only) one side at 240C for 10mins, remove from oven, flip over another side, wait oven back to 240C and grill for 7mins or until golden brown with slight burnt.
6. Once done, let it cool and enjoy!

http://nasilemaklover.blogspot.sg/2012/01/homemade-chinese-pork-jerky-bak-kwa.html

Now that's the recipe and here's our adaptation.


Mix minced meat with seasonings as stated.
We found 100g of sugar too much so if you're trying this out,
probably 80g would be enough.
The caramel sauce and honey would be more than enough to impart the sweetness


We let this bake in the oven at 100 degrees celcius on a baking sheet held down with coins for about twenty minutes or till solid.
Then carefully remove from the baking sheet and cut into desired pieces.

And here comes the fun part.
Setting up the BBQ pit and barbequeing these with a glazing of honey till the edges are browned.
Keep watch because you wouldn't want them to turn charcoal!


And after all that mayhem,
we finally settle down to a thick slab of 500g Australian wagyu.
Perfectly panfried with a deliciously pink interior.
Just the way we like it.
:)

Tuesday, February 05, 2013

lemon meringue tarts

We decided to make a refreshing lemon meringue tart for the mad hot summer we were having.

We decided to use our own tried and tested recipe for the tart shell instead of the huge one that's on the recipe.

250g butter, room temperature
100g vanilla sugar
1 egg
400g all purpose flour
½ teaspoon salt

Combine the flour, sugar and salt. Cut the butter into the dry ingredients and rub it in!
Once you’ve got a crumbly mixture, make a well in the center and pour in the beaten egg. Slowly start moving the crumbles to the middle of the well and mixing until it starts to come together like cookie dough. Divide up the tart shell pastry and it makes about 18 to 20 small tart shells. 

Bake it blind for 15 minutes at 180 degrees celcius then remove the beans and bake till golden brown and set aside.

And then we realised...

We only had two lemons! And not even a single orange.
Yes, the recipe only required a single one.
Thankfully, help was always on hand and the supermarket was just across the road.
So 4013 navel oranges. That's the magic number for sweetness it seems.
That's how we managed to make lemon curd even though we had a major oversight. :p


Mix the cornflour, sugar and lemon zest in a medium saucepan. Strain and stir in the lemon juice gradually. Make orange juice up to 200ml/7fl oz with water and strain into the pan. Cook over a medium heat, stirring constantly, until thickened and smooth. Once the mixture bubbles, remove from the heat and beat in the butter until melted. Beat the egg yolks (save white for meringue) and whole egg together, stir into the pan and return to a medium heat. Keep stirring vigorously for a few minutes, until the mixture thickens and plops from the spoon. (It will bubble, but doesn't curdle.) Take off the heat and set aside while you make the meringue.


Put the egg whites in a large bowl. Whisk to soft peaks, then add half the sugar a spoonful at a time, whisking between each addition without overbeating. Whisk in the cornflour, then add the rest of the sugar as before until smooth and thick. Quickly reheat the filling and pour it into the pastry case. Immediately put spoonfuls of meringue around the edge of the filling (if you start in the middle the meringue may sink), then spread so it just touches the pastry (this will anchor it and help stop it sliding). Pile the rest into the centre, spreading so it touches the surface of the hot filling (and starts to cook), then give it all a swirl. Return to the oven for 18-20 mins until the meringue is crisp and slightly coloured. Let the pie sit in the tin for 30 mins, then remove and leave for at least another 1⁄2-1 hr before slicing. Eat the same day.


Ingredients

FOR THE PASTRY

  • 175g plain flour
  • 100g cold butter , cut in small pieces
  • 1 tbsp icing sugar
  • 1 egg yolk

FOR THE FILLING

  • 2 level tbsp cornflour
  • 100g golden caster sugar
  • finely grated zest 2 large lemon
  • 125ml fresh lemon juice (from 2-3 lemons)
  • juice 1 small orange
  • 85g butter , cut into pieces
  • 3 egg yolks and a 1 whole egg

FOR THE MERINGUE

  • 4 egg whites , room temperature
  • 200g golden caster sugar
  • 2 level tsp cornflour

Now there's where we got the recipe for but it was for a large pie. So you've got to adjust the timings accordingly and WATCH your meringues. 
Those pretty meringues have tricky peaks that would turn charcoal on you if you weren't careful :p

If you aren't eating it the same day, your meringue would lose its satisfying crisp. 
You could try chilling it then reheating it in the oven though but it's never really the same.

Try it yourself and let me know how yours turned out!

We loved ours :)